Hosted Functions
Hosted Functions allow you to run custom code within Comecero's infrastructure. This allows you to run custom logic to handle countless scenarios to your exact specifications while removing the need for you to worry about servers, uptime, monitoring, security and other IT headaches.
Your custom functions can be written in Node.js, Python, Java or C# (.NET Core), giving you the option to choose a language you are comfortable with.
You can think of a Hosted Function like a mini REST API. When you create a Hosted Function, you'll receive back a URL that you can use to invoke it. You can then issue GET, POST, PUT, PATCH and / or DELETE calls to the Hosted Function along with whatever request body, headers, and query string parameters your function requires.
Additionally, you can configure your Hosted Functions to automatically run in response to events such as a new order created, payment completed, subscription cancelled and much, much more.
In this tutorial, we're going to build a small function that adds a customer to our MailChimp mailing list after they place an order. We'll use Node.js as our coding language.
The Code
First we'll show you the code. Keep reading below the code sample for a more in-depth explanation of inputs and outputs. You can download the fully functional Hosted Function from this tutorial here.
var request = require("request");

exports.handler = function (event, context, callback) {

    // Purpose:
    // This script is designed to send new customers from new orders to a MailChimp list

    // Configuration:
    // This script should receive an order:created event with expand=customer

    // Environment Variables to be added when you upload the code for the Hosted Function:

    // mailchimp_api_key: The MailChimp API key. Get an API key in MailChimp by clicking on
    // your profile in the upper right of the MailChimp control panel, select Account>
    // Extras> API keys

    // mailchimp_list_id: The MailChimp list or lists you want the customer to be
    // subscribed to. The list ID can be found in MailChimp. Navigate to the list, go to
    // Settings> List Name and Defaults, look for the property "List ID".

    // Define the items in the request that we might want to use.
    var headers = event.headers;
    var queryStringParameters = event.queryStringParameters;
    var body = JSON.parse(event.body);
    var ev = process.env;

    // We are going to configure this hosted function to be invoked by a Comecero event
    // notification. The order is contained in the event notification's "data" property.
    var order = body.data;

    // This is a function we'll use to send the response back to the handler when
    // we've finished processing the request.
    var sendResponse = function (statusCode, outputBody) {

        // The response should include the following:
        // statusCode: The HTTP status code (i.e. 200)
        // headers: Headers to include in the HTTP response to the caller
        // body: The response body (optional - can be null or a string)
        var response = {
            statusCode: statusCode,
            body: null,
            headers: {
                "Content-Type": "application/json"
            }
        };

        if (outputBody) {
            response.body = JSON.stringify(outputBody)
        }

        // The format of the callback function is: callback(error, success)
        // Generally even if an error scenario you should pass through a success response
        // with the error condition in the response (such as statusCode: 400 with the
        // error as the body). If you send an error to the callback, the response HTTP status
        // code to the caller will always be 502.
        callback(null, response);

    };

    // Set up the MailChimp request payload
    var payload = {
        email_address: order.customer.email,
        status: "subscribed",
        merge_fields: {}
    }

    // If you have the customer's name, split into a first and last name.
    // You could add other merge fields that you've configured for your list
    // as needed and fill them in from the order and customer data.
    if (order.customer.name) {
        var nameSplit = order.customer.name.split(" ");
        // Add to the payload to include with the subscriber's profile.
        payload.merge_fields.FNAME = nameSplit[0].trim();
        if (nameSplit.length > 1)
            payload.merge_fields.LNAME = nameSplit[1].trim();
    }

    // The host for the request is the characters after the last dash in the api key.
    var host = ev.mailchimp_api_key.substring(ev.mailchimp_api_key.lastIndexOf("-") + 1);

    // Set up your api request options
    var options = {
        url: "https://" + host + ".api.mailchimp.com/3.0/lists/" + ev.mailchimp_list_id + "/members",
        auth: {
            // The MailChimp API does not require a username, but you must pass through some (any) string
            user: "not-used",
            pass: ev.mailchimp_api_key,
        },
        body: payload,
        json: true
    };

    // Send the request
    request.post(options, function (error, response) {
        if (!error && response.statusCode >= 200 && response.statusCode < 300) {
            // Pass through the response from MailChimp to the caller.
            sendResponse(200, response.body);
            return;
        } else {
            if (response && response.body) {
                // Pass through the error response from MailChimp to the caller.
                sendResponse(response.statusCode, response.body);
                return;
            } else {
                // Pass through whatever error was supplied to the caller.
                sendResponse(502, error);
                return;
            }
        }
    });

};
Input Parameters
OK, let's understand what's sent to your function when it's invoked.
Our function code will have a main "handler" that will receive the incoming request that looks like this:
exports.handler = function (event, context, callback) {
    // Your function code goes here
};
Here's a look at the parameters that are sent:
event : This contains the payload for the request, and contains some important properties:
event.httpMethod: The HTTP method used to invoke the function (such as GET, POST, etc.). This can be used within your function to know how to respond to the request.event.headers: An object that contains all the HTTP headers sent to your function. For example, it might look something like this:
{
   "Accept": "application/json, text/plain, */*",
   "Host": "functions.comecero.com",
   "Content-Type": "application/json"
   "X-My-Header": "my-custom-value"
}
The following headers are always provided in your headers for your convenience: X-Account-Id (the account ID the Hosted Function is deployed in), X-Test (indicates if the Hosted Function is running as test or live), X-Hosted-Function-Id (the Hosted Function ID, assigned when you create the hosted function).
event.queryStringParameters: An object that contains all the query string parameters in the request to your Hosted Function. For example:
{
   "this": "that",
   "more": "stuff"
}
event.body: A string that contains the request body, if any. Note that your body can contain JSON, XML, whatever you want. It is passed in as a string. This means that if your payload is JSON, you should parse it to turn it into a JavaScript object. For example:
var body = JSON.parse(event.body);
event.path: The path of the Hosted Function, which is everything after the protocol and host. For example, if the Hosted Function URL ishttps://functions.comecero.com/func/v1/0118109048334HfN3oRTa6, the value forevent.pathwould be/func/v1/0118109048334HfN3oRTa6.
context : An object that contains various technical details about the runtime environment. You generally won't use this object in your Hosted Function.
callback : A function that you call to send a response upon completion of your code. The syntax of the callback is: callback(error, success). Since our API behaves like a mini-REST API, you generally won't use the error parameter (just set it to null). You'll use the success parameter to send the response in all cases so that you can provide a precise response to your caller. If you provide a value for the error parameter, the caller will always receive a 502 HTTP response.
The success object contains the following properties and the values you provide are used to construct the HTTP response that is sent to the caller.
- statusCode: i.e. 200, 201, 400, etc.
- headers: The HTTP headers you want included in the response. The "Content-Type" header is particularly helpful so your caller can parse your response.
- body: Optional, can be null or a string.
Here's an example of a response object:
{
   statusCode: 200,
   body: "{ \"this\":\"is my payload\", \"more\":\"stuff\" }",
   headers: {
      "Content-Type":"application/json"
   }
}
Environment Variables
Environment variables give you the option to configure variables to be provided to your Hosted Function at runtime. You can supply environment variables when you upload your Hosted Function code to Comecero. This makes it easier to run the same code in live and test environments by supplying runtime variables as a configuration rather than hard-coding them in your source code. It also allows you to keep sensitive data out of your source code. We encrypt Environment variables at rest.
process.env: The object that contains the Environment Variables that you configured to be passed into your function at runtime, among other values about the runtime environment.For example, we are passing in our MailChimp API token and List ID as Environment Variables instead of hard coding them. In our case, the
process.envobject will look something like this:
{
   mailchimp_api_key: "W16zObh4D2OZb7bfVj91fBTWSRK0Xkx4hGryTPt1-us6",
   mailchimp_list_id: "mjnibwh5s1",
   whatever: "you want"
}
Putting it Together
Now, let's create a directory on our local machine to hold our project files, and then let's create a file index.js to hold our function code. Copy and paste the example code earlier in the tutorial into the index.js file.
Next, because our Hosted Function will make an external HTTP request to the MailChimp API, we're going to install the convenient request library for use within our code. From within the project folder, we run: npm install request. This should download the request files to the node_modules directory within our project folder. We'll include the entire node_modules folder when we zip our project file to upload to Comecero.
Now, let's zip the project together to prepare to upload it. Create a zip file that includes the index.js file we created and the node_modules folder that was created when we installed the request library.
Sign into your Comecero account. Switch to Test mode in the upper right. Navigate to Developer> Hosted Functions. In the upper right, click "Add New".
Supply the following values:
- Name: MailChimp List Import
- Handler: index.handler (index comes from the name of the file that contains the file, i.e. index.js, handler comes from the name of the handler in our function, i.e. exports.handler). The value you provide here could be different if you used a different name for code file and handler.
- Runtime Environment: Node.js 4.3
- Add the following Environment Variables:
- mailchimp_api_key To get your API key sign into MailChimp and click on your profile in the upper right of the MailChimp control panel, select Account> Extras> API keys
- mailchimp_list_id To get your list ID, sign into MailChimp, navigate to the list, go to Settings> List Name and Defaults, look for the property "List ID"
Drag or click to select the zip file that contains your Hosted Function for upload. Click to save your Hosted Function. That's it! Your Hosted Function is now created.
Invoking the Function
Navigate back to the Hosted Function you just created. At the top of the page, you'll be provided with a URL that can be used to invoke the function. There are two ways to invoke your Hosted Function.
In Response to an Event Notification
To invoke your Hosted Function in response to a Comecero Event Notification, create a new Event Subscription. Navigate to Developer> Event Subscriptions and click Add New from the upper right.
In this example, we'll select "Order Created" as the event type we want to subscribe to. Configure the following:
- Method: HTTP / HTTPS
- Format: JSON
- Destination URL: The Invoke URL from our Hosted Function.
- Expand: customer
You can leave all other fields blank
That's it! Save your Event Subscription and the next order you place will load the customer into the MailChimp list you configured in your Hosted Function. You can place a test order to make sure everything is working.
Note than when you configure the event to run in response to an event notification, you do not need to supply a Comecero token as you do when you invoke the Hosted Function directly (see below). However, the Hosted Function you create will only successfully run when configured for Event Subscriptions within the same account that the Hosted Function is in. If you would like to create a public Hosted Function that can be used in any account, please contact support.
Directly
To invoke your Hosted Function directly, you can use a tool such as curl, Postman or other tools designed to make HTTP requests. You can even invoke a Hosted Function from another Hosted Function you create, or from code running in your own systems. To invoke the function, you'll need to supply a Comecero token in the request that has permissions to create hosted function executions. From within your Comecero account:
- Navigate to Developer> API Tokens
- In the upper right, click Add New
- Token Type: Secret
- Select Permissions: Under "Hosted Function Executions", check "Create". You don't need any other permissions.
With your secret token in hand, you are now ready to invoke your function. You can provide your secret token in your HTTP request one of two ways:
- As a Bearer token in the Authorization header: Add the following header to your request:
Authorization: Bearer your-token-here
- As "token" in the query string:
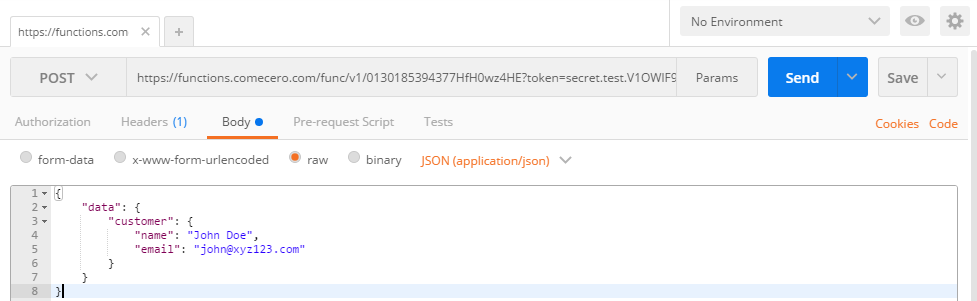
https://functions.comecero.com/func/v1/0130185394377HfH0wz4HE?token=your-token-here
The Hosted Function in this tutorial expects an event notification payload when called. We'll mock up a small payload to simulate it, naturally an actual event notification will contain a lot of additional data.
{
    "data": {
        "customer": {
            "name": "John Doe",
            "email": "john@xyz123.com"
        }
    }
}
Here's a sample curl request that invokes our Hosted Function:
curl -X POST -H "Authorization: Bearer your-token-here" -H "Content-Type: application/json" -H "Cache-Control: no-cache" -d '{
    "data": {
        "customer": {
            "name": "John Doe",
            "email": "john@xyz123.com"
        }
    }
}' "https://functions.comecero.com/func/v1/0130185394377HfH0wz4HE"
And here's a screenshot of sending the request in Postman. Note that in this example we supplied the token through the query string and not an HTTP request header.
Download the code from this tutorial here. It's ready-to-go if you want to test it out in your own account.